When deciding how to film the scene, I decided to start off with a bit of anticipation by having the x-wing fly past a stationary target camera followed by nothing happening for a couple of seconds. Then the tie-fighters flying past the x-wing at speed, causing the camera to shake to help give the impression of speed.
There is also anticipation in quite a few other places, as the ships will start to bank just before they go around the corners.
The camera also changes to on top of the x-wing so that you can see roughly what the pilot sees I did this using a target camera moving along the same path as the x-wing. I was going to have it from the pilots point of view at first, but it I felt it became bit hard to see what was happening when the x-wing starts banking and turning quickly so I changed it to on top and just follow the path and not banking of the x-wing instead as this still gave a similar impression of what the pilot is seeing without it being too hard to see for yourself what is actually happening.
When the ships go through the hollow asteroid, the camera is in front of the x-wing, facing backwards so that you can get a good view of the asteroid to see how tight a gap it is, as well as being able to see 2 of the ships crash and blow up when they don't make it through.
I also have a stationary free camera placed close to an asteroid that the ships go around. This camera shows just how close and fast the ships are flying to the asteroids.
At the end, right after the last tie-fighter blows up, the x-wing does a barrel roll to celebrate having been able to out manoeuvre the other ships, therefore causing them to blow up and him to survive.
When it came to rendering the final video I tried to use video post, but this would crash every time I tried to run the sequence. After doing a bit of research online I found the cause of the problem, which is that video post will only work if the cameras it will be using are currently active in one of the viewports. The reason it kept crashing for me is because I have 6 different cameras and therefore it was not possible to have all 6 cameras active at once as I looked for a way to increase the amount of viewports and everywere I found online said that it wasnt possible to have more than 4. To get around this I rendered the video in 2 halves, and then joined the 2 halves together using sony vegas so I then had my final video.
Thursday, 8 December 2011
Animating the ships
To animate the ships, I decided to draw a line (the line under the splines option) to mark the route I wanted the ships to fly around the asteroid field. I then used the patch constraint tool to get the ship to move along the path I had chosen.
While that worked well at getting the ship to move in the right direction, it did not rotate the ship to face the right way or make it bank around the corners. To do this I used the auto key function on it, and went through the animation rotating and banking the ships (using the rotate tool) to make it look like they are actually flying. To help make this easier, I set the view from global to local so that the same axis always rotated it the same way, e.g. the y-axis would always bank the ship.
For when the ship crashes into an asteroid, I put a keyframe there and then removed the rest of the path it was following so that the ship would stop inside the asteroid therefore hiding it from view. To simulate the explosion I used a bright yellow light that would flash in a similar way to an explosion would.
While that worked well at getting the ship to move in the right direction, it did not rotate the ship to face the right way or make it bank around the corners. To do this I used the auto key function on it, and went through the animation rotating and banking the ships (using the rotate tool) to make it look like they are actually flying. To help make this easier, I set the view from global to local so that the same axis always rotated it the same way, e.g. the y-axis would always bank the ship.
 |
| 2 of the ships banking |
For when the ship crashes into an asteroid, I put a keyframe there and then removed the rest of the path it was following so that the ship would stop inside the asteroid therefore hiding it from view. To simulate the explosion I used a bright yellow light that would flash in a similar way to an explosion would.
 |
| Light explosion |
Friday, 25 November 2011
Making the asteroid field and background
For the bakground I used a geosphere. Instead of cutting it in half to make it a semi-sphere though, I kept it as a sphere because I knew I would be having the camera revolve around the spaceship and therefore looking in all directions. When I textured it I started by looking for a few different pictures of skymaps using google, and while this did find a few pictures that looked very good, when I put them onto the geosphere either the seams would show quite clearly, the stars were far to big or the tiling was very obvious. After trying a lot of sky maps I decided to draw my own one instead using photoshop, and as there arn't any distinguising features it means that the tiling isnt really noticable.
With the asteroid field, I decided to do it differently to the one I did earlier in this module as I found out a way to make them faster and with more detail. The way I did this was put a geosphere onto the scene and then added a noise modifyer to it, and then to texture it I then found a rock texture and just put that on it. Due to the jagged edges caused by the noise filter the seams are not noticable.
After I had the 1 asteroid, I copied it a few times, changing the noise seed number and strength for each one. I then copied each new asteroid twice more and made the first copy of each asteroid bigger and the second copy smaller using the scale tool.
 |
| The skymap |
With the asteroid field, I decided to do it differently to the one I did earlier in this module as I found out a way to make them faster and with more detail. The way I did this was put a geosphere onto the scene and then added a noise modifyer to it, and then to texture it I then found a rock texture and just put that on it. Due to the jagged edges caused by the noise filter the seams are not noticable.
After I had the 1 asteroid, I copied it a few times, changing the noise seed number and strength for each one. I then copied each new asteroid twice more and made the first copy of each asteroid bigger and the second copy smaller using the scale tool.
 |
| One of the asteroids |
Thursday, 27 October 2011
Week 6
This week I modelled and textured the final 2 models that I needed for the assignment.
For the x wing I modelled, as I knew it was going to be a more complex model than the tie fighter I decided to do it in different parts. The hull, engine and guns were modelled from a cylinder, with the wings being a long thin box. As this model is made up of different parts, I also labelled them all so I know what part is what just from the name.
Once I had finished the model I then textured it the same way I textured the tie fighter.
 |
| Final model |
 |
| Different parts of the model |
 |
| Body UVW template |
 |
| Body UVW texture |
The other model I made was one of the asteroids. To model this I started out with a sphere and then used the paint deformation tool to make the surface uneven so it looks more like an asteroid. I then made the UVW template and started to draw the texture.
Unlike with the textures for the ships, I was unable to use pictures because the seams would show so I had to draw the texture myself, making sure to keep the edges of the polys the same colour so that the seams don't show. I did this by covering all of the polys with a single colour and then added a bit of detail.
 |
| Finished asteroid |
 |
| Asteroid UVW template |
 |
| Asteroid UVW texture |
Sunday, 23 October 2011
Week 5
This week I learnt how to apply textures to the models I have made using the unwrap UVW feature. When using this I used the different mapping options to help group the sections into separate parts that I will be able to texture.
As I am not good at drawing, I found pictures of a tie fighter online then cut and cropped them to fit the different parts of the tie fighter. I then applied it as a texture to the model in 3DS max
As I am not good at drawing, I found pictures of a tie fighter online then cut and cropped them to fit the different parts of the tie fighter. I then applied it as a texture to the model in 3DS max
 |
| The UVW template |
 |
| The UVW template after I add the detail |
 |
| The final tie fighter model |
Monday, 17 October 2011
Week 3
At the start of this week I started to work on a village. For the house I wanted it to look like actual logs even when close up so I used a lot of cylinders to make the walls. To cut out the roof shape from these I used a large rectangular box and shaped the bottom to match the shape of the roof I wanted, used the Boolean tool to cut the logs and then shaped the top half of the roof.
For the floor and river, I used a plane and then the paint deformation to drag out the river. I then used the tube to make the bridge and Boolean to cut out the part of the bridge that isn't seen as its below the ground.

I then decided to practise using the 3 view modelling using a tie plane. The way I was shown during the lectures was to model half of it and then copy that half and flip it around using the mirror tool to get the whole model. I had a look at the mirror option though and saw that it had a copy feature included in it, with one of the copy options being an instance.
Because of this, I decided to create a mirror instance copy of the model as soon as I started (when it was just a semi-sphere) so that as I model one half, the other half gets modelled in real time letting me see how the whole model will look and not just half of it.
The large "wings" on the side of the tie plane I modelled by extruding the side of the semi-sphere out and then using outline to make them large, extruded them again to get the width, finally I extruded them once more and used outline to make the last surface a lot smaller again to create the bevelled look you can see in the front view of the wing below.
I have kept the poly count low (around 200) on purpose for a few reasons. The first reason is that with a low poly count the final animation will render a lot faster and also if the model was to be used in a game then a high poly count could cause the game to require to have a very low fps or not even be playable as high poly models require high processing power. The other reason is that when it comes to texturing the models I am going to be using pictures as my drawing skills are not that good and with a high poly model getting the pictures to line up properly could be very hard.

Sunday, 9 October 2011
Week 2
This week I continued to practise using the tools I had used last week, as well as learned how to use 2 new ones, the boolean cutter and allign. The turrets started out as a tube. I then used the boolean tool to cut the viewing holes into the side of them about half way down. I then converted them to polys so I could pull out the top and bottom to get there shape how I wanted it, then pulled down parts of the top to create supports.
For the roof, I used a cone and converted it to a poly so I could make the sides more curved, then the allign tool to line it up properly with the turret.
For the roof, I used a cone and converted it to a poly so I could make the sides more curved, then the allign tool to line it up properly with the turret.
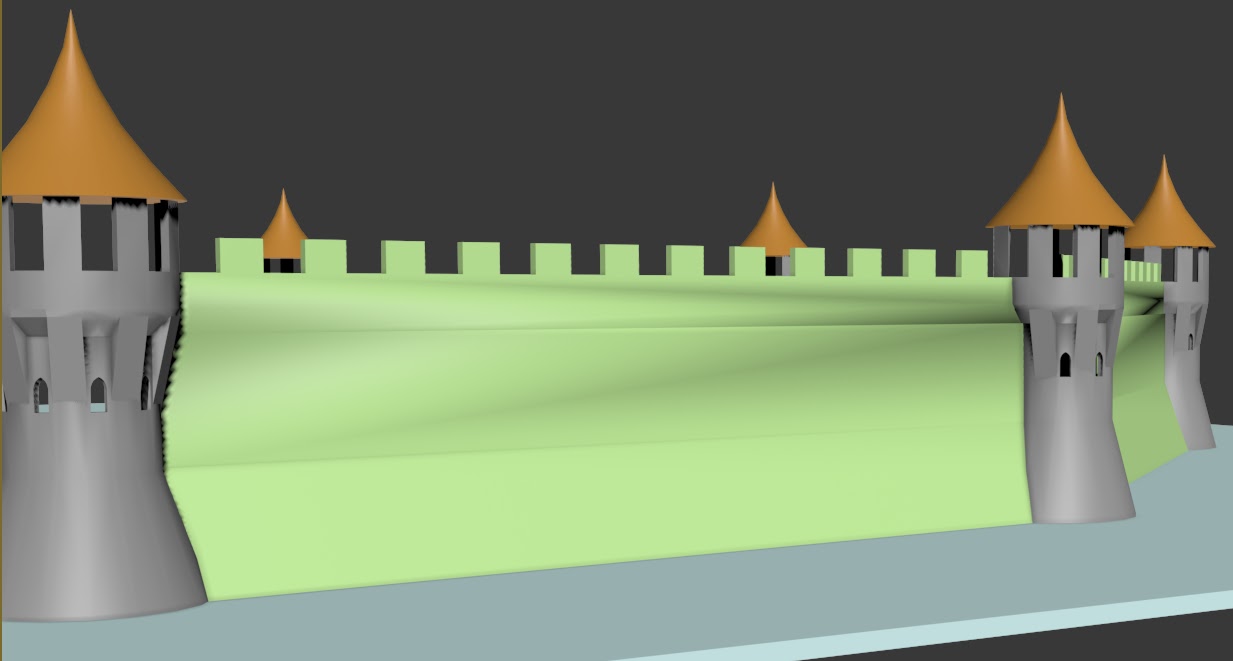 |
| What the outside of the turrets and walls look like |
 |
| What the inside of the turrets look like |
Subscribe to:
Comments (Atom)